原创
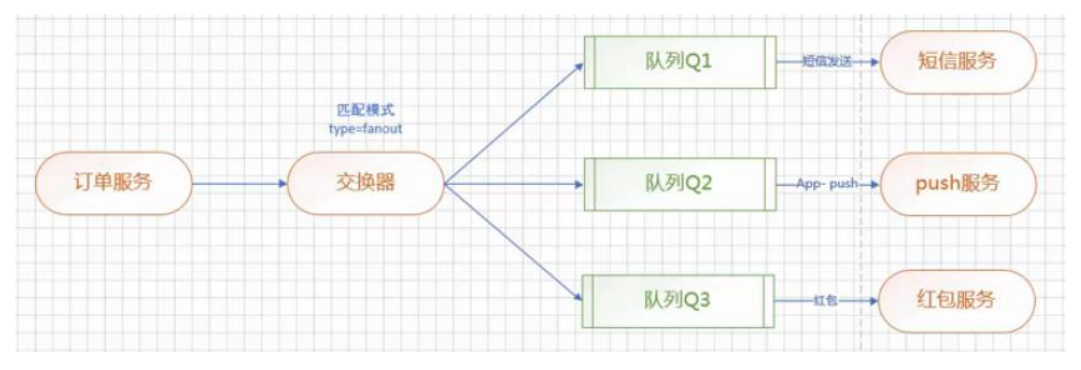
使用 RabbitMQ 实现松耦合设计
温馨提示:
本文最后更新于 2019年03月21日,已超过 2,649 天没有更新。若文章内的图片失效(无法正常加载),请留言反馈或直接联系我。
生产者
application.properties
spring.rabbitmq.host=localhost
spring.rabbitmq.port=5672
spring.rabbitmq.username=guest
spring.rabbitmq.password=guest

mq.config.exchange=order.fanout
Sender
package com.lzhpo.rabbitmq.rabbitmqfanoutouheprovider;

import org.springframework.amqp.core.AmqpTemplate;
import org.springframework.beans.factory.annotation.Autowired;
import org.springframework.beans.factory.annotation.Value;
import org.springframework.stereotype.Component;

/**
 * 消息发送者
 * @author Administrator
 *
 */
@Component
public class Sender {

    @Autowired
    private AmqpTemplate rabbitAmqpTemplate;

    //exchange 交换器名称
    @Value("${mq.config.exchange}")
    private String exchange;

    /*
     * 发送消息的方法
     */
    public void send(String msg){
        //向消息队列发送消息
        //参数一:交换器名称。
        //参数二:路由键
        //参数三:消息
        this.rabbitAmqpTemplate.convertAndSend(this.exchange,"", msg);
    }
}
RabbitmqFanoutOuheProviderApplicationTests测试类
package com.lzhpo.rabbitmq.rabbitmqfanoutouheprovider;

import org.junit.Test;
import org.junit.runner.RunWith;
import org.springframework.beans.factory.annotation.Autowired;
import org.springframework.boot.test.context.SpringBootTest;
import org.springframework.test.context.junit4.SpringRunner;

@RunWith(SpringRunner.class)
@SpringBootTest
public class RabbitmqFanoutOuheProviderApplicationTests {

    @Autowired
    private Sender sender;

    /**
     * 测试消息队列
     */
    @Test
    public void contextLoads() {
        this.sender.send("Hello RabbitMQ");
    }

}
消费者
application.properties
spring.rabbitmq.host=localhost
spring.rabbitmq.port=5672
spring.rabbitmq.username=guest
spring.rabbitmq.password=guest

mq.config.exchange=order.fanout

mq.config.queue.sms=order.sms

mq.config.queue.push=order.push

mq.config.queue.red=red
PushReceiver
package com.lzhpo.rabbitmq.rabbitmqfanoutouheconsumer;

import org.springframework.amqp.core.ExchangeTypes;
import org.springframework.amqp.rabbit.annotation.Exchange;
import org.springframework.amqp.rabbit.annotation.Queue;
import org.springframework.amqp.rabbit.annotation.QueueBinding;
import org.springframework.amqp.rabbit.annotation.RabbitHandler;
import org.springframework.amqp.rabbit.annotation.RabbitListener;
import org.springframework.stereotype.Component;

/**
 * 消息接收者
 * @author Administrator
 * @RabbitListener bindings:绑定队列
 * @QueueBinding  value:绑定队列的名称
 *                exchange:配置交换器
 *
 * @Queue value:配置队列名称
 *        autoDelete:是否是一个可删除的临时队列
 *
 * @Exchange value:为交换器起个名称
 *           type:指定具体的交换器类型
 */
@Component
@RabbitListener(
            bindings=@QueueBinding(
                    value=@Queue(value="${mq.config.queue.push}",autoDelete="true"),
                    exchange=@Exchange(value="${mq.config.exchange}",type=ExchangeTypes.FANOUT)
            )
        )
public class PushReceiver {

    /**
     * 接收消息的方法。采用消息队列监听机制
     * @param msg
     */
    @RabbitHandler
    public void process(String msg){
        System.out.println("Push..........receiver: "+msg);
    }
}
RedReceiver
package com.lzhpo.rabbitmq.rabbitmqfanoutouheconsumer;

import org.springframework.amqp.core.ExchangeTypes;
import org.springframework.amqp.rabbit.annotation.Exchange;
import org.springframework.amqp.rabbit.annotation.Queue;
import org.springframework.amqp.rabbit.annotation.QueueBinding;
import org.springframework.amqp.rabbit.annotation.RabbitHandler;
import org.springframework.amqp.rabbit.annotation.RabbitListener;
import org.springframework.stereotype.Component;

/**
 * 消息接收者
 * @author Administrator
 * @RabbitListener bindings:绑定队列
 * @QueueBinding  value:绑定队列的名称
 *                exchange:配置交换器
 *                key:路由键
 *
 * @Queue value:配置队列名称
 *        autoDelete:是否是一个可删除的临时队列
 *
 * @Exchange value:为交换器起个名称
 *           type:指定具体的交换器类型
 */
@Component
@RabbitListener(
            bindings=@QueueBinding(
                    value=@Queue(value="${mq.config.queue.red}",autoDelete="true"),
                    exchange=@Exchange(value="${mq.config.exchange}",type=ExchangeTypes.FANOUT)
            )
        )
public class RedReceiver {

    /**
     * 接收消息的方法。采用消息队列监听机制
     * @param msg
     */
    @RabbitHandler
    public void process(String msg){
        System.out.println("给用户发送10元红包........receiver: "+msg);
    }
}
SmsReceiver
package com.lzhpo.rabbitmq.rabbitmqfanoutouheconsumer;

import org.springframework.amqp.core.ExchangeTypes;
import org.springframework.amqp.rabbit.annotation.Exchange;
import org.springframework.amqp.rabbit.annotation.Queue;
import org.springframework.amqp.rabbit.annotation.QueueBinding;
import org.springframework.amqp.rabbit.annotation.RabbitHandler;
import org.springframework.amqp.rabbit.annotation.RabbitListener;
import org.springframework.stereotype.Component;

/**
 * 消息接收者
 * @author Administrator
 * @RabbitListener bindings:绑定队列
 * @QueueBinding  value:绑定队列的名称
 *                exchange:配置交换器
 *                key:路由键
 *
 * @Queue value:配置队列名称
 *        autoDelete:是否是一个可删除的临时队列
 *
 * @Exchange value:为交换器起个名称
 *           type:指定具体的交换器类型
 */
@Component
@RabbitListener(
            bindings=@QueueBinding(
                    value=@Queue(value="${mq.config.queue.sms}",autoDelete="true"),
                    exchange=@Exchange(value="${mq.config.exchange}",type=ExchangeTypes.FANOUT)
            )
        )
public class SmsReceiver {

    /**
     * 接收消息的方法。采用消息队列监听机制
     * @param msg
     */
    @RabbitHandler
    public void process(String msg){
        System.out.println("Sms........receiver: "+msg);
    }
}
Main
package com.lzhpo.rabbitmq.rabbitmqfanoutouheconsumer;

import org.springframework.boot.SpringApplication;
import org.springframework.boot.autoconfigure.SpringBootApplication;

@SpringBootApplication
public class RabbitmqFanoutOuheConsumerApplication {

    public static void main(String[] args) {
        SpringApplication.run(RabbitmqFanoutOuheConsumerApplication.class, args);
    }

}
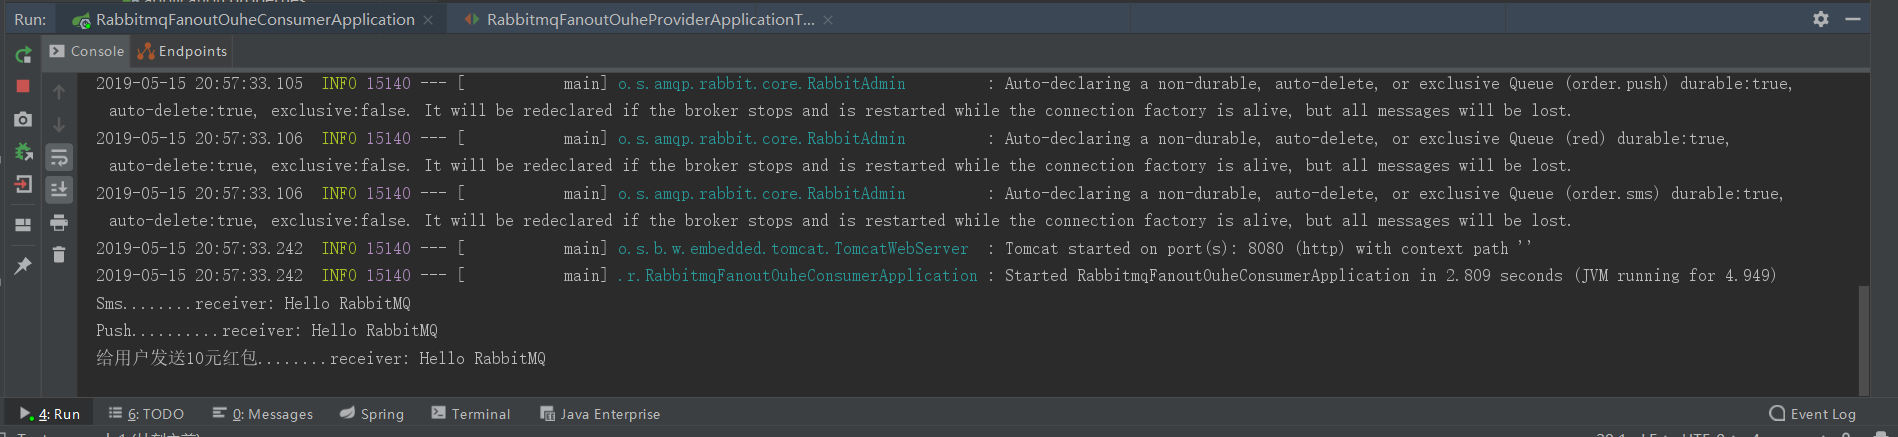
测试结果
先运行消费者,然后再运行生产者的RabbitmqFanoutOuheProviderApplicationTests测试类。
- 本文标签: RabbitMQ
- 本文链接: http://www.lzhpo.com/article/7
- 版权声明: 本文由lzhpo原创发布,转载请遵循《署名-非商业性使用-相同方式共享 4.0 国际 (CC BY-NC-SA 4.0)》许可协议授权
热门推荐


相关文章
关于我

会打篮球的程序猿
Talk is cheap, show me the code.