
原创
基于推和拉两种方式消费RabbitMQ消息
温馨提示:
本文最后更新于 2024年04月28日,已超过 785 天没有更新。若文章内的图片失效(无法正常加载),请留言反馈或直接联系我。
前言
”推“模式:
- MQ主动将消息推送给消费者
- 实时性较高
”拉“模式:
- 消费者主动从MQ中拉取消息
- 实时性不高
- 降低系统吞吐量
通常我们是用”推“模式的,但是,由于某种原因,可能只有在满足某种条件下,消费者才能去进行消费,或者需要批处理的时候,此时就需要用到”拉“模式。
一、“推”模式
1.定义交换机、队列、路由键以及yml配置
package com.lzhpo.common.queue.rabbitmq.consts;

import lombok.AccessLevel;
import lombok.NoArgsConstructor;

/** @author lzhpo */
@NoArgsConstructor(access = AccessLevel.PRIVATE)
public final class RabbitConst {

  public static final String PUSH_EXCHANGE = "sun.push.exchange";
  public static final String PUSH_QUEUE = "sun.push.queue";
  public static final String PUSH_ROUTING_KEY = "sun.push.routing-key";
}
配置:
spring:
  rabbitmq:
    host: 127.0.0.1
    port: 5672
    username: guest
    password: guest
    virtual-host: /
    # 开启发送失败退回
    publisher-returns: true
    # 开启消息确认机制
    publisher-confirm-type: correlated
    template:
      # 设置消费者在消息没有被路由到合适队列情况下会被return监听,而不会自动删除
      mandatory: true
    listener:
      type: simple
      simple:
        # 手动ACK
        acknowledge-mode: manual
        # 重试次数超过上面的设置之后是否丢弃(要想将无法消费的消息丢到死信队列,此处必须配置为false)
        default-requeue-rejected: false
        retry:
          # 开启重试机制
          enabled: true
          # 重试次数,默认:3次
          max-attempts: 3
2.定义消费者
import com.lzhpo.common.queue.rabbitmq.consts.RabbitConst;
import com.rabbitmq.client.Channel;
import java.util.Map;
import lombok.extern.slf4j.Slf4j;
import org.springframework.amqp.rabbit.annotation.Exchange;
import org.springframework.amqp.rabbit.annotation.Queue;
import org.springframework.amqp.rabbit.annotation.QueueBinding;
import org.springframework.amqp.rabbit.annotation.RabbitListener;
import org.springframework.amqp.support.AmqpHeaders;
import org.springframework.messaging.handler.annotation.Headers;
import org.springframework.stereotype.Component;

/** @author lzhpo */
@Slf4j
@Component
public class RabbitPushConsumer {

  @RabbitListener(
      bindings = {
        @QueueBinding(
            value = @Queue(value = RabbitConst.PUSH_QUEUE, durable = "true", autoDelete = "false"),
            exchange = @Exchange(value = RabbitConst.PUSH_EXCHANGE),
            key = {RabbitConst.PUSH_ROUTING_KEY})
      })
  public void listener(String message, @Headers Map<String, Object> headers, Channel channel) {
    log.info("Consumer receive new message: {}", message);

    final Long deliveryTag = (Long) headers.get(AmqpHeaders.DELIVERY_TAG);

    try {
      channel.basicAck(deliveryTag, false);
      log.info("Consumption success: {}", message);
    } catch (Exception e) {
      log.error("Abnormal consumption!", e);

      try {
        channel.basicNack(deliveryTag, false, true);
      } catch (Exception ex) {
        log.error("Reject message exception!", ex);
      }
    }
  }
}
这里headers同时也可以获取其它信息:
final String exchange = (String) headers.get(AmqpHeaders.RECEIVED_EXCHANGE);
final String queue = (String) headers.get(AmqpHeaders.CONSUMER_QUEUE);
final String routingKey = (String) headers.get(AmqpHeaders.RECEIVED_ROUTING_KEY);
3.简单写一个生产者测试用例发送消息
  @Test
  void send() {
    RabbitTemplate rabbitTemplate = SpringUtil.getBean(RabbitTemplate.class);
    // 消息发送到RabbitMQ交换机后接收ack回调(不能依靠此ack值判断消息是否被消费者成功消费)
    rabbitTemplate.setConfirmCallback(
        (correlationData, ack, cause) -> {
          if (ack) {
            log.info("Successfully to send message to exchange! ");
          } else {
            log.error(
                "Failed to send message to exchange! correlationData: {}, cause: {}",
                correlationData,
                cause);
          }
        });
    rabbitTemplate.setMandatory(true);
    // 消息发送到RabbitMQ交换机,但无相应queue时的回调
    rabbitTemplate.setReturnsCallback(
        returned ->
            log.error(
                "The message sent has no corresponding queue! Returned message: {}", returned));
    rabbitTemplate.convertAndSend(RabbitConst.PUSH_EXCHANGE, RabbitConst.PUSH_ROUTING_KEY, "123");
  }
4.测试结果

二、“拉”模式(可批量)
1.定义交换机、队列、路由键常量以及yml配置
import lombok.AccessLevel;
import lombok.NoArgsConstructor;

/** @author lzhpo */
@NoArgsConstructor(access = AccessLevel.PRIVATE)
public final class RabbitConst {

  public static final String PULL_EXCHANGE = "sun.pull.exchange";
  public static final String PULL_QUEUE = "sun.pull.queue";
  public static final String PULL_ROUTING_KEY = "sun.pull.routing-key";
}
yml配置:
spring:
  rabbitmq:
    host: 127.0.0.1
    port: 5672
    username: guest
    password: guest
    virtual-host: /
    # 开启发送失败退回
    publisher-returns: true
    # 开启消息确认机制
    publisher-confirm-type: correlated
    template:
      # 设置消费者在消息没有被路由到合适队列情况下会被return监听,而不会自动删除
      mandatory: true
    listener:
      type: simple
      simple:
        # 手动ACK
        acknowledge-mode: manual
        # 重试次数超过上面的设置之后是否丢弃(要想将无法消费的消息丢到死信队列,此处必须配置为false)
        default-requeue-rejected: false
        retry:
          # 开启重试机制
          enabled: true
          # 重试次数,默认:3次
          max-attempts: 3
2.将交换机、队列、路由键进行绑定
import com.lzhpo.common.queue.rabbitmq.consts.RabbitConst;
import org.springframework.amqp.core.Binding;
import org.springframework.amqp.core.BindingBuilder;
import org.springframework.amqp.core.DirectExchange;
import org.springframework.amqp.core.Queue;
import org.springframework.amqp.rabbit.connection.ConnectionFactory;
import org.springframework.amqp.rabbit.core.RabbitTemplate;
import org.springframework.beans.factory.config.ConfigurableBeanFactory;
import org.springframework.context.annotation.Bean;
import org.springframework.context.annotation.Configuration;
import org.springframework.context.annotation.Scope;

/** @author lzhpo */
@Configuration
public class RabbitConfig {

  /**
   * Prototype for {@link RabbitTemplate}
   *
   * @param connectionFactory {@link ConnectionFactory}
   * @return {@link RabbitTemplate}
   */
  @Bean
  @Scope(ConfigurableBeanFactory.SCOPE_PROTOTYPE)
  public RabbitTemplate rabbitTemplate(ConnectionFactory connectionFactory) {
    RabbitTemplate template = new RabbitTemplate(connectionFactory);
    template.setMandatory(true);
    return template;
  }

  /**
   * Create {@link RabbitConst#PULL_EXCHANGE} direct type exchange
   *
   * @return {@link DirectExchange}
   */
  @Bean
  public DirectExchange pullDirectExchange() {
    return new DirectExchange(RabbitConst.PULL_EXCHANGE, true, false);
  }

  /**
   * Create {@link RabbitConst#PULL_QUEUE} queue
   *
   * @return {@link Queue}
   */
  @Bean
  public Queue pullQueue() {
    return new Queue(RabbitConst.PULL_QUEUE, true);
  }

  /**
   * Binding {@link RabbitConfig#pullQueue()} with {@link RabbitConfig#pullQueue()}
   *
   * @return {@link Binding}
   */
  @Bean
  public Binding pullBinding() {
    return BindingBuilder.bind(pullQueue())
        .to(pullDirectExchange())
        .with(RabbitConst.PULL_ROUTING_KEY);
  }
}
3.编写简单测试用例
import cn.hutool.extra.spring.SpringUtil;
import com.lzhpo.common.queue.rabbitmq.TestRabbitMqApp;
import com.lzhpo.common.queue.rabbitmq.consts.RabbitConst;
import com.lzhpo.common.queue.rabbitmq.utils.MessageUtil;
import com.rabbitmq.client.GetResponse;
import java.util.ArrayList;
import java.util.List;
import java.util.Objects;
import lombok.Data;
import lombok.extern.slf4j.Slf4j;
import org.junit.jupiter.api.Test;
import org.springframework.amqp.rabbit.core.RabbitTemplate;
import org.springframework.boot.test.context.SpringBootTest;

/** @author lzhpo */
@Slf4j
@SpringBootTest(classes = TestRabbitMqApp.class)
class PullConsumerTest {

  @Test
  void producer() {
    for (int i = 1; i <= 10; i++) {
      SampleMessage sampleMessage = new SampleMessage();
      sampleMessage.setId(i);
      sampleMessage.setName("Lewis-" + i);
      String messageJson = MessageUtil.toJsonString(sampleMessage);

      RabbitTemplate rabbitTemplate = SpringUtil.getBean(RabbitTemplate.class);
      // 消息发送到RabbitMQ交换机后接收ack回调(不能依靠此ack值判断消息是否被消费者成功消费)
      rabbitTemplate.setConfirmCallback(
          (correlationData, ack, cause) -> {
            if (ack) {
              log.info("Successfully to send message to exchange! message: {}", messageJson);
            } else {
              log.error(
                  "Failed to send message to exchange! message: {},correlationData: {}, cause: {}",
                  messageJson,
                  correlationData,
                  cause);
            }
          });
      rabbitTemplate.setMandatory(true);
      // 消息发送到RabbitMQ交换机,但无相应queue时的回调
      rabbitTemplate.setReturnsCallback(
          returned ->
              log.error(
                  "The message sent has no corresponding queue! Returned message: {}", returned));
      rabbitTemplate.convertAndSend(RabbitConst.PULL_EXCHANGE, RabbitConst.PULL_ROUTING_KEY, messageJson);
    }
  }

  @Test
  void consumer() {
    // 要拉取的消息条数
    int batchSize = 2;

    RabbitTemplate rabbitTemplate = SpringUtil.getBean(RabbitTemplate.class);
    rabbitTemplate.execute(
        channel -> {
          List<SampleMessage> messageBodyList = new ArrayList<>(batchSize);
          long deliveryTag = 0;

          while (messageBodyList.size() < batchSize) {
            GetResponse response = channel.basicGet(RabbitConst.PULL_QUEUE, false);
            log.info("The result of pulling the message response this time: {}", response);
            if (Objects.isNull(response)) {
              break;
            }

            byte[] bodyBytes = response.getBody();
            String json = new String(bodyBytes);
            SampleMessage messageBody = MessageUtil.parse(json, SampleMessage.class);
            messageBodyList.add(messageBody);
            deliveryTag = response.getEnvelope().getDeliveryTag();
          }

          log.info(
              "A total of {} messages were pulled this time:{}",
              messageBodyList.size(),
              messageBodyList);

          try {
            // 可以在此做一些业务操作
            // 也可以将此消费者测试用例封装起来,用java.util.function.Consumer作为参数传入,在此进行consumer.accept(messageBodyList),以确保业务操作成功之后ack

            channel.basicAck(deliveryTag, true);
          } catch (Exception e) {
            log.error("Abnormal consumption!", e);

            try {
              channel.basicNack(deliveryTag, true, true);
            } catch (Exception ex) {
              log.error("Reject message exception!", ex);
            }
          }

          // Or you can return the result to handle it yourself,
          // but you must ensure that the ack will not affect you
          return null;
        });
  }

  @Data
  private static class SampleMessage {
    private int id;
    private String name;
  }
}
上面消费者当中,可以手动指定要拉取的消息条数,拉取之后也可以做一些业务操作,然后再进行ack(确保业务操作成功之后再ack)
4.生产者发送消息
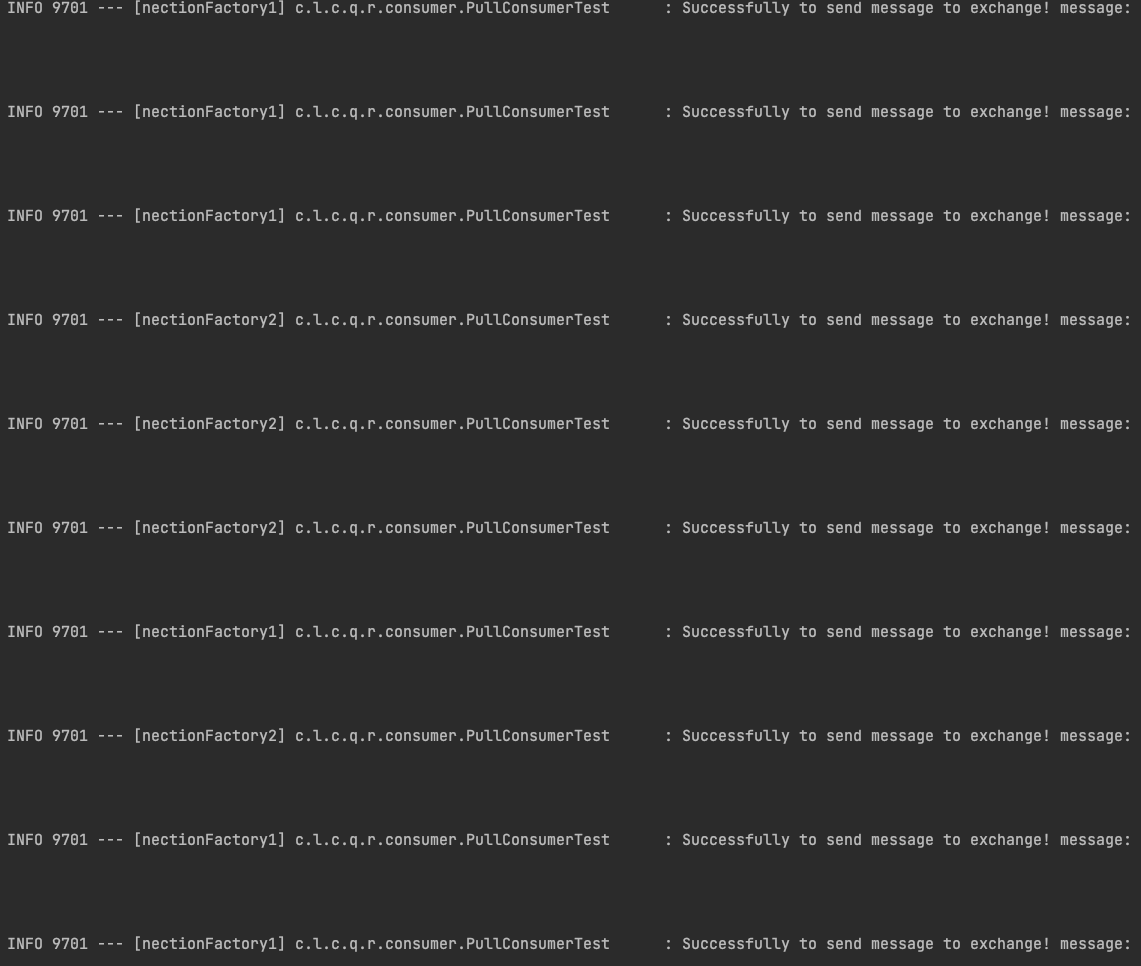
RabbitMQ控制台同样也可以看得到有10条消息:

5.手动拉取两条消息进行消费

RabbitMQ控制台也看得到少了两条已消费的消息:

说明
关于deliveryTag
deliveryTag:消息投递序号。范围是1~9223372036854775807(long类型最大值)。
当注册消费者时,RabbitMQ将使用basic.deliver方法传递消息,该方法带有一个deliveryTag,它唯一地标识一个channel上的传递,因此,deliveryTag的范围仅限于channel。
在手动ack的时候,deliveryTag也可用于ack、nack、reject等操作。
手动应答同时也可被批处理,它可以减少网络流量。
ack、nack的mutiple参数设置为true,则可以一次性应答deliveryTag小于等于传入值的所有应答。
例如:
// 手动消费,第二个参数即为mutiple
channel.basicAck(deliveryTag, true);
// 手动拒绝消息
// 第二个参数即为mutiple
// 第三个参数为requeue:被拒绝的消息是否应该重新排队而不是丢弃/死信
channel.basicNack(deliveryTag, true, true);
在最前面的”推“模式的消费者中,mutiple参数就是为false,即一条一条消费。
- 本文标签: Java RabbitMQ
- 本文链接: http://www.lzhpo.com/article/172
- 版权声明: 本文由lzhpo原创发布,转载请遵循《署名-非商业性使用-相同方式共享 4.0 国际 (CC BY-NC-SA 4.0)》许可协议授权
热门推荐


相关文章
关于我

会打篮球的程序猿
Talk is cheap, show me the code.