
以RemoteTokenServices举例,从授权服务器获取OAuth2访问令牌,并将身份验证对象加载到 SecurityContext整个过程源码解析
前言
我们配置OAuth2的时候都会配置资源服务器以及认证服务器,当我们的授权服务和认证服务不在同一个服务中的时候,就可以考虑用RemoteTokenServices了;
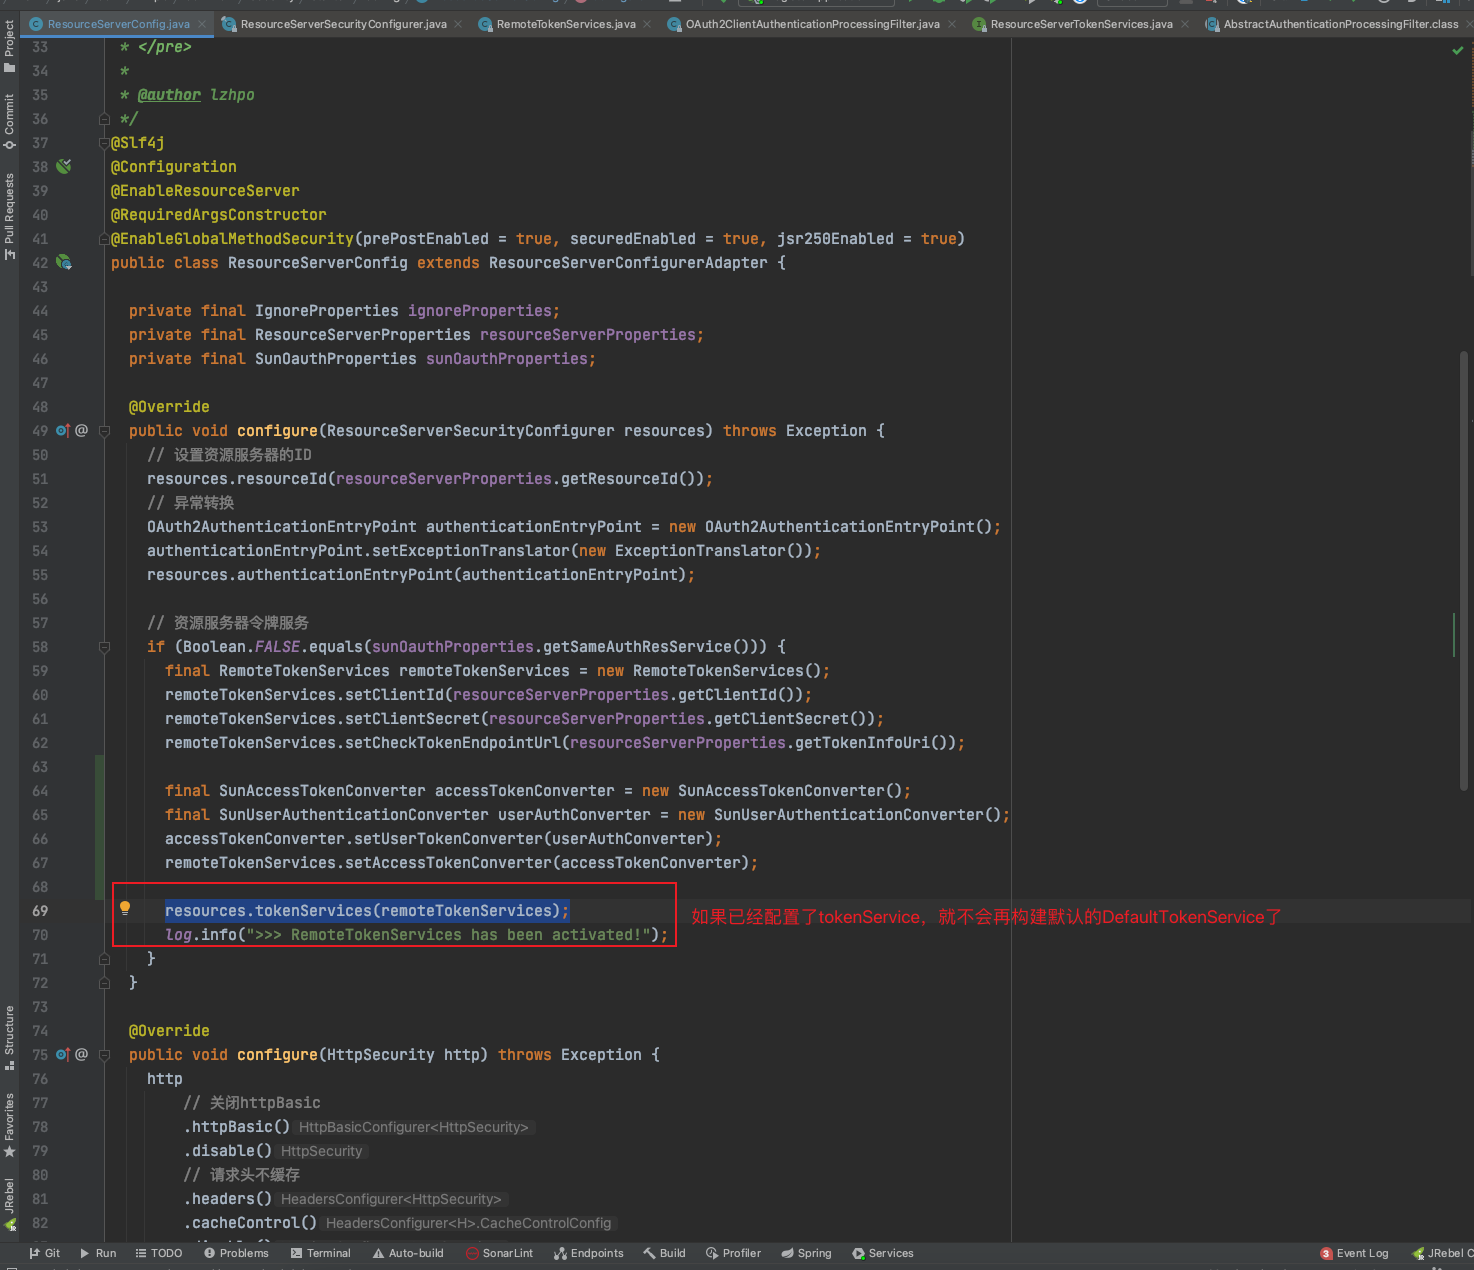
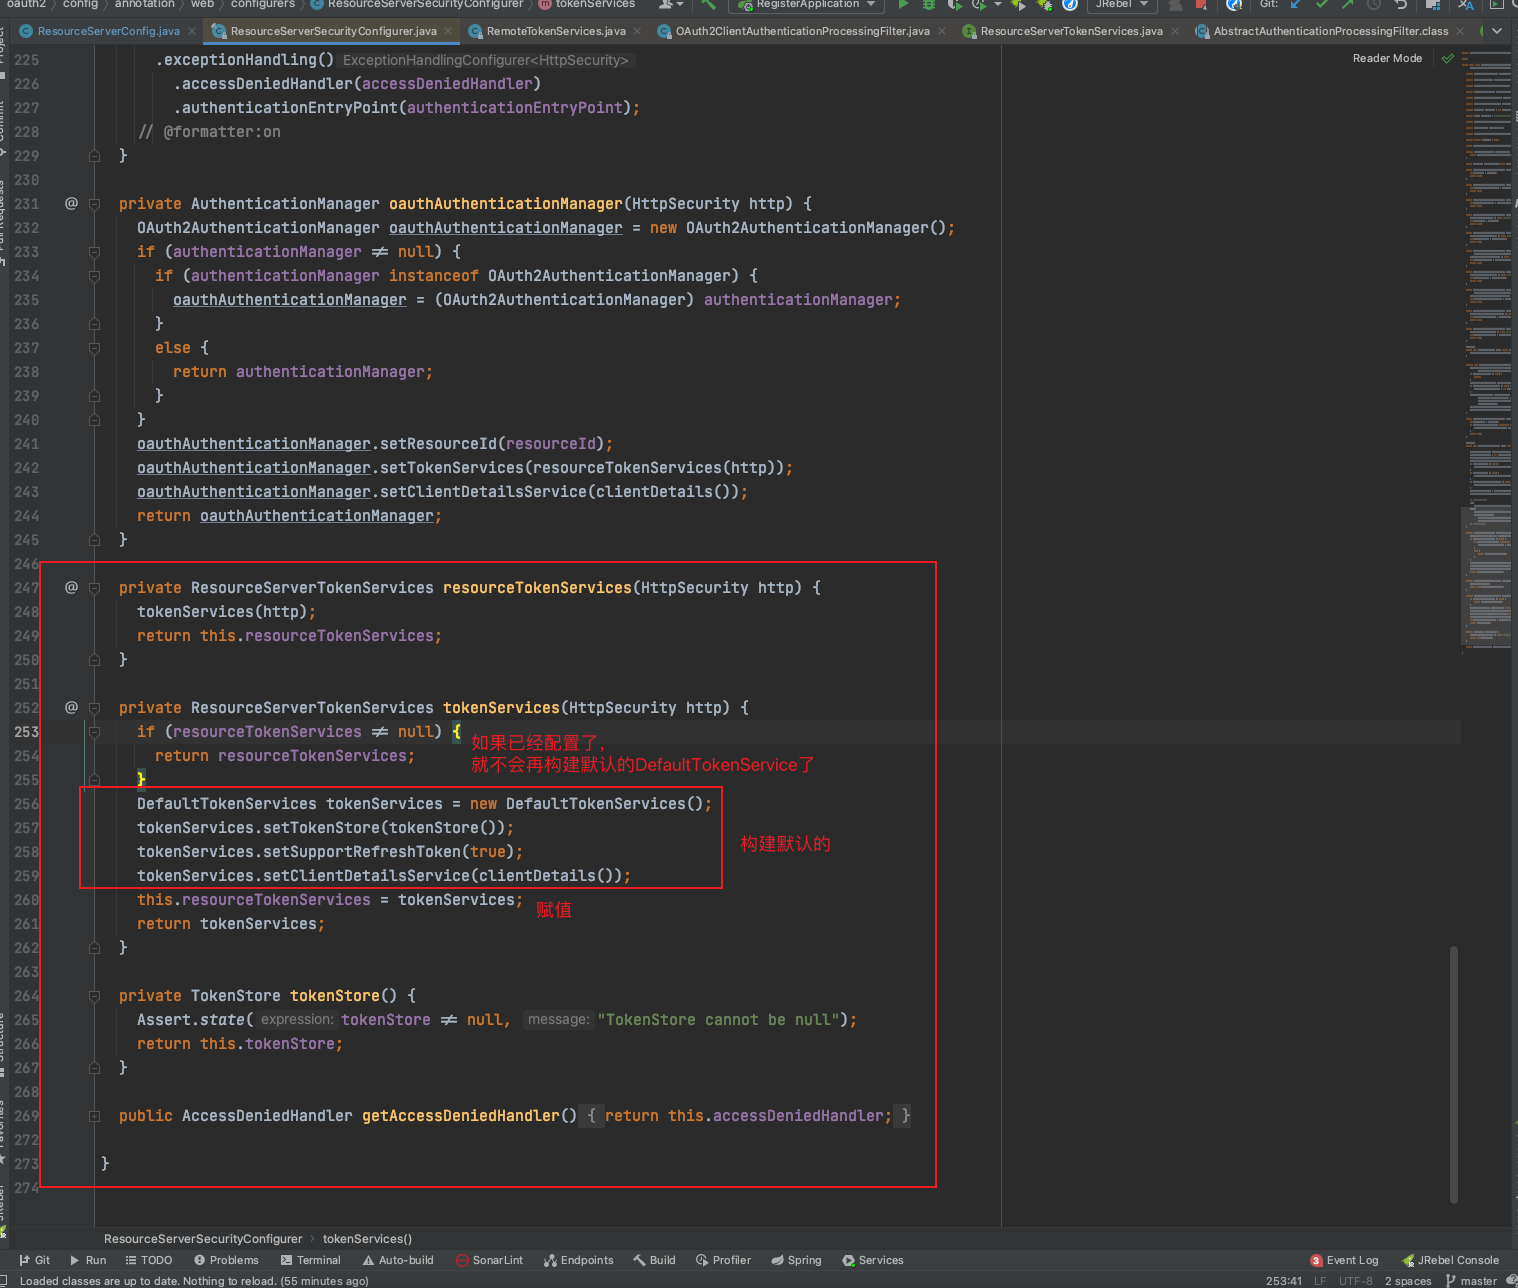
如果在同一个的话,则可以不需要配置tokenServices,因为当配置了ResourceServerConfigurerAdapter的时候,如果没有配置tokenServices,会自动配置一个默认的DefaultTokenServices。而这两个tokenService类都是实现了ResourceServerTokenServices接口。
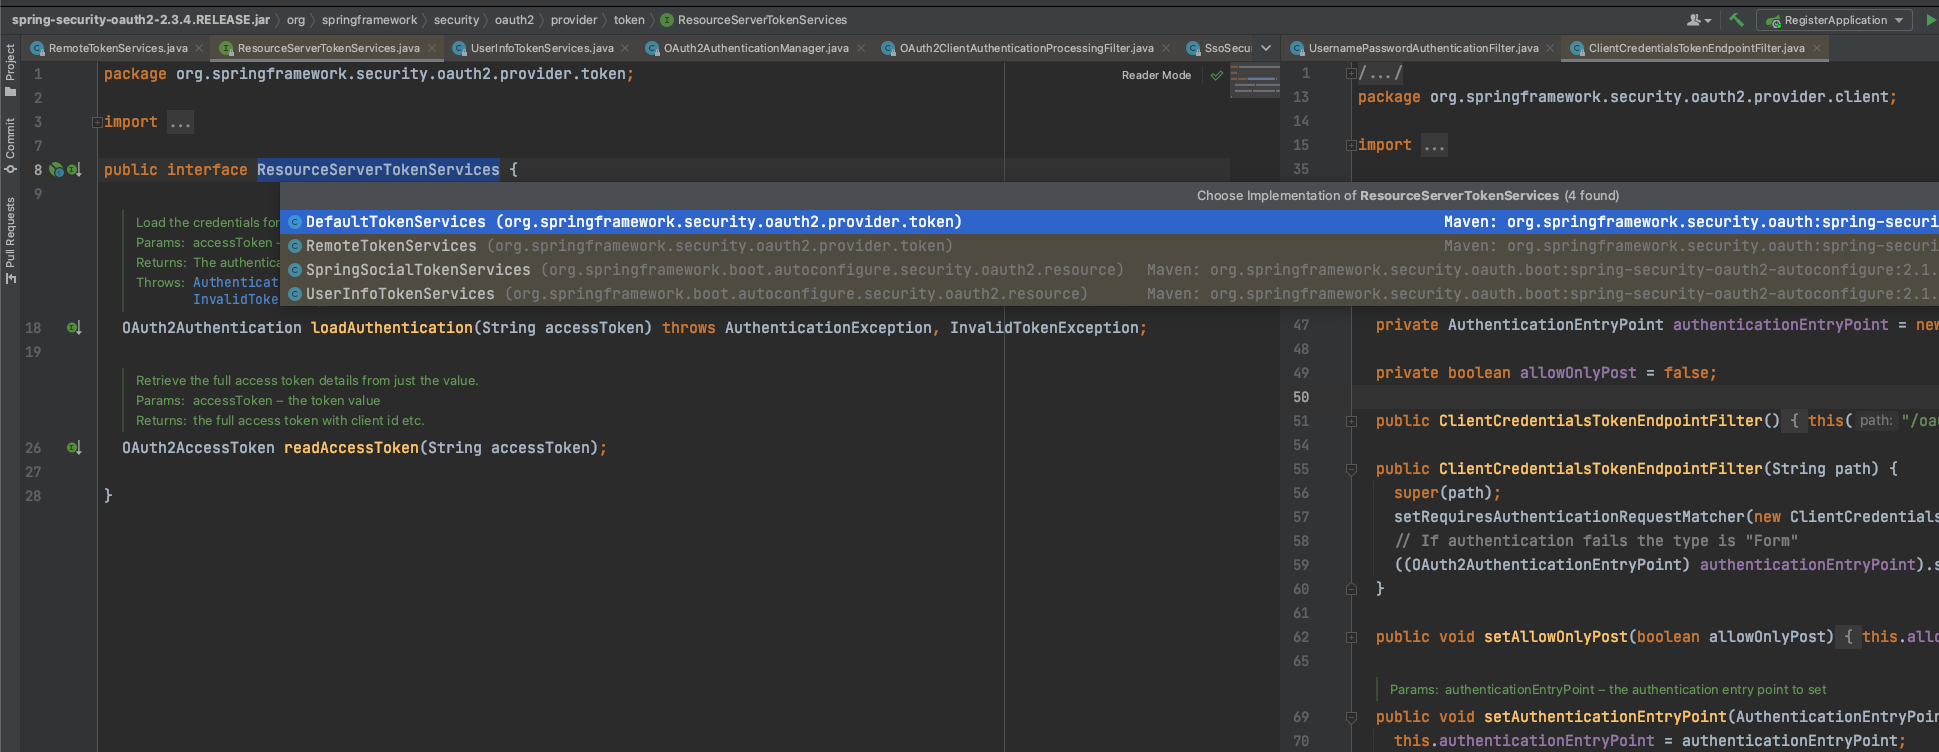
ResourceServerTokenServices默认一共有四个实现类:
其实不管是RemoteTokenServices,还是其它的也罢,本质都是实现了ResourceServerTokenServices接口,来完成加载访问令牌的凭据以及检索令牌详细信息。
public interface ResourceServerTokenServices {

    /**
     * Load the credentials for the specified access token.
     *
     * @param accessToken The access token value.
     * @return The authentication for the access token.
     * @throws AuthenticationException If the access token is expired
     * @throws InvalidTokenException if the token isn't valid
     */
    OAuth2Authentication loadAuthentication(String accessToken) throws AuthenticationException, InvalidTokenException;

    /**
     * Retrieve the full access token details from just the value.
     *
     * @param accessToken the token value
     * @return the full access token with client id etc.
     */
    OAuth2AccessToken readAccessToken(String accessToken);

}
所以,这里我采用顺藤摸瓜的方式,以RemoteTokenServices为例,一步一步往上走,看一下这个过程是如何完成的。
1.如何配置RemoteTokenServices?
配置OAuth2资源服务器ResourceServerConfigurerAdapter的时候,可以配置tokenService。
resources.tokenServices(xxx);
remoteTokenServices.setClientId(resourceServerProperties.getClientId());
remoteTokenServices.setClientSecret(resourceServerProperties.getClientSecret());
// 设置/oauth/check_token端点
remoteTokenServices.setCheckTokenEndpointUrl(resourceServerProperties.getTokenInfoUri());
配置application.yml:
# oauth2配置
security:
  oauth2:
    client:
      # 客户端ID
      client-id: ${OAUTH2_CLIENT_ID:lzhpo}
      # 客户端秘钥(加密前)
      client-secret: ${OAUTH2_CLIENT_SECRET:lzhpo1024}
      # 授权类型
      grant-type: ${OAUTH2_GRANT_TYPE:authorization_code,password,refresh_token,implicit,client_credentials}
      # 权限范围
      scope: ${OAUTH2_SCOPE:all}
      # 用于密码模式,获取访问令牌的地址(org.springframework.security.oauth2.provider.endpoint.TokenEndpoint)
      access-token-uri: ${OAUTH2_ACCESS_TOKEN_URI:http://localhost:9999/api/auth/oauth/token}
      # 用于授权码模式,获取授权码的地址(org.springframework.security.oauth2.provider.endpoint.AuthorizationEndpoint)
      user-authorization-uri: ${OAUTH2_USER_AUTHORIZATION_URI:http://localhost:9999/api/auth/oauth/authorize}
    resource:
      # 资源服务器编号
      id: ${spring.application.name}
      # 校验访问令牌是否有效的地址(org.springframework.security.oauth2.provider.endpoint.CheckTokenEndpoint.checkToken)
      token-info-uri: ${OAUTH2_TOKEN_INFO_URI:http://localhost:9999/api/auth/oauth/check_token}
      # 获取用户信息
      user-info-uri: ${OAUTH2_USER_INFO_URI:http://localhost:9999/api/auth/oauth/check_user}
      # 默认使用token-info-uri,可以设置为false以使用user-info-uri
      prefer-token-info: true
然后在认证服务器上配置(继承了AuthorizationServerConfigurerAdapter类的):
  /**
   * Authorization server security
   *
   * <p>isAuthenticated()、permitAll() <br>
   * If the endpoint /oauth/check_token is Authenticated, header Authorization is required. <br>
   * e.g: {@code Authorization:Basic bHpocG86bHpocG8xMDI0}
   *
   * <pre>
   * Reference:{@link AuthorizationServerProperties}
   *
   * Also can configure in application.properties or application.yml:
   * {@code
   *  security.oauth2.authorization.token-key-access: isAuthenticated()
   *  security.oauth2.authorization.check-token-access: isAuthenticated()
   * }
   * </pre>
   *
   * @param security security
   */
  @Override
  public void configure(AuthorizationServerSecurityConfigurer security) {
    security
        // Allow the client to send a form for permission authentication to obtain a token
        .allowFormAuthenticationForClients()
        // Endpoint: /oauth/token_key
        // If you use jwt, the public key that can be obtained is used for token verification
        .tokenKeyAccess("isAuthenticated()")
        // Endpoint: /oauth/check_token
        .checkTokenAccess("isAuthenticated()");
  }
配置isAuthenticated()的意思就是需要认证,在请求头设置Authorization的值为Basic + 客户端ID:客户端密钥的Base64值。
比如:
Authorization:Basic bHpocG86bHpocG8xMDI0
ResourceServerSecurityConfigurer源代码,位置:org.springframework.security.oauth2.config.annotation.web.configurers.ResourceServerSecurityConfigurer

关键代码就在这:
    private ResourceServerTokenServices tokenServices(HttpSecurity http) {
        if (resourceTokenServices != null) {
            return resourceTokenServices;
        }
        DefaultTokenServices tokenServices = new DefaultTokenServices();
        tokenServices.setTokenStore(tokenStore());
        tokenServices.setSupportRefreshToken(true);
        tokenServices.setClientDetailsService(clientDetails());
        this.resourceTokenServices = tokenServices;
        return tokenServices;
    }
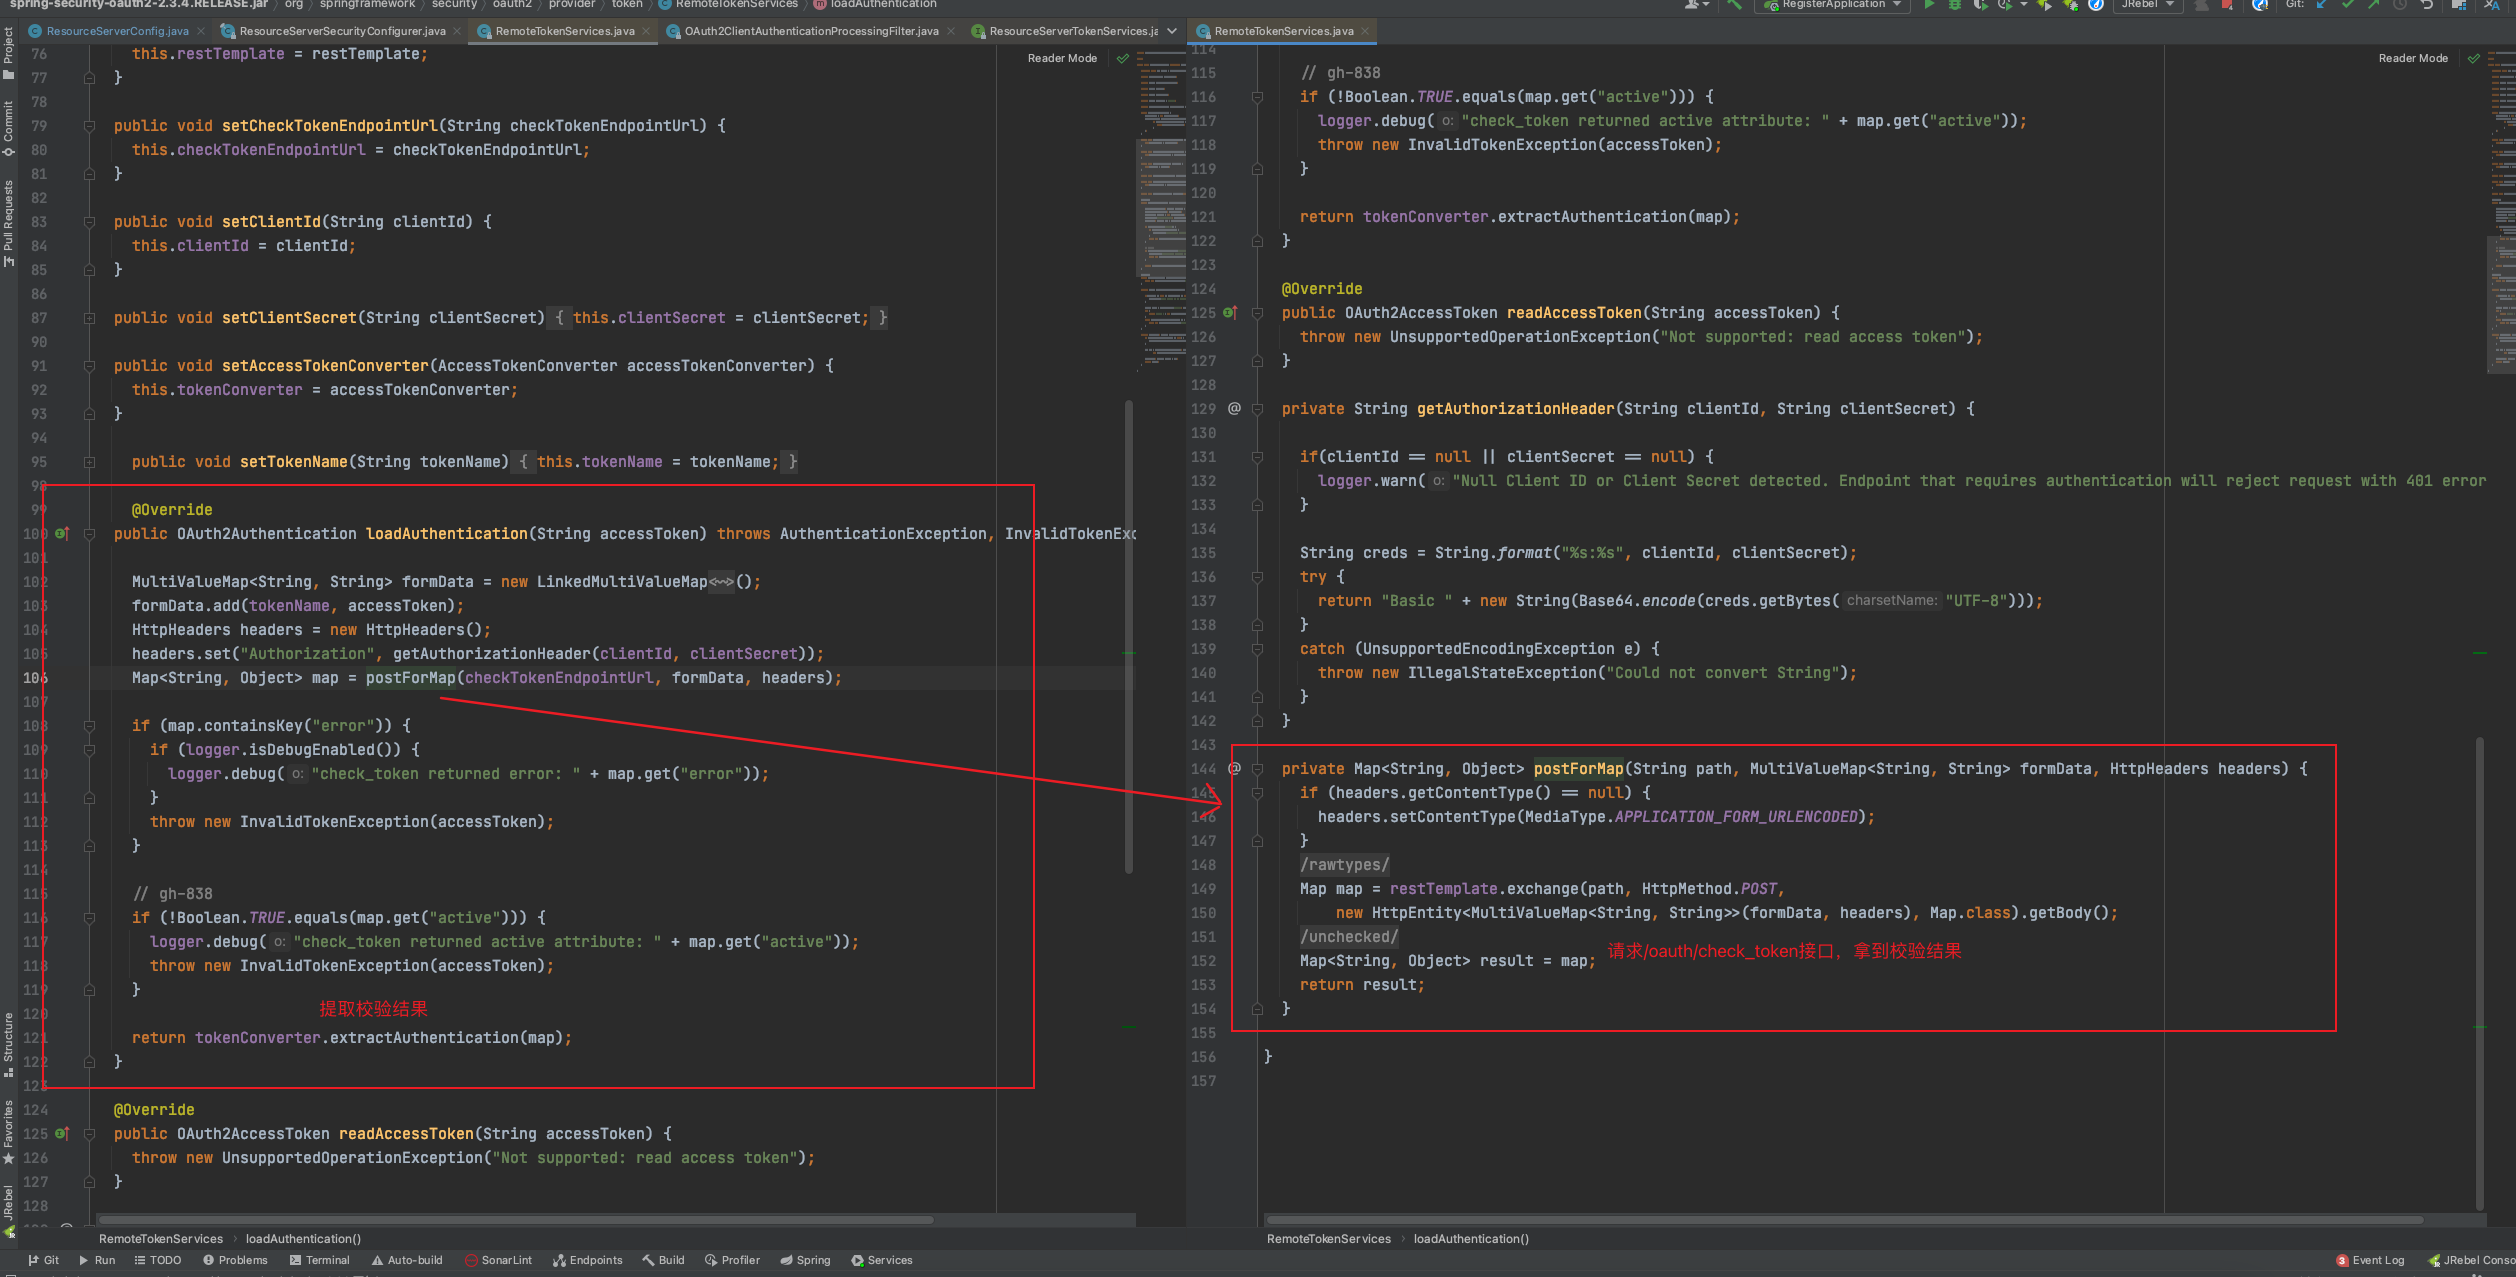
2.RemoteTokenServices请求/oauth/check_token接口
RemoteTokenServices,代码位置:org.springframework.security.oauth2.provider.token.RemoteTokenServices
3.OAuth2ClientAuthenticationProcessingFilter拿到请求的结果,尝试进行认证
代码位置:org.springframework.security.oauth2.client.filter.OAuth2ClientAuthenticationProcessingFilter#attemptAuthentication
关键代码:
    @Override
    public Authentication attemptAuthentication(HttpServletRequest request, HttpServletResponse response)
            throws AuthenticationException, IOException, ServletException {

        OAuth2AccessToken accessToken;
        try {
            accessToken = restTemplate.getAccessToken();
        } catch (OAuth2Exception e) {
            BadCredentialsException bad = new BadCredentialsException("Could not obtain access token", e);
            publish(new OAuth2AuthenticationFailureEvent(bad));
            throw bad;
        }
        try {
            // 这里就是前面`RemoteTokenServices`请求`/oauth/check_token`接口,拿到校验结果的
            OAuth2Authentication result = tokenServices.loadAuthentication(accessToken.getValue());
            if (authenticationDetailsSource!=null) {
                request.setAttribute(OAuth2AuthenticationDetails.ACCESS_TOKEN_VALUE, accessToken.getValue());
                request.setAttribute(OAuth2AuthenticationDetails.ACCESS_TOKEN_TYPE, accessToken.getTokenType());
                result.setDetails(authenticationDetailsSource.buildDetails(request));
            }
            publish(new AuthenticationSuccessEvent(result));
            return result;
        }
        catch (InvalidTokenException e) {
            BadCredentialsException bad = new BadCredentialsException("Could not obtain user details from token", e);
            publish(new OAuth2AuthenticationFailureEvent(bad));
            throw bad;
        }

    }
4.装载身份认证信息
它有3个子类,分别是org.springframework.security.web.authentication.UsernamePasswordAuthenticationFilter、org.springframework.security.oauth2.provider.client.ClientCredentialsTokenEndpointFilter、org.springframework.security.oauth2.client.filter.OAuth2ClientAuthenticationProcessingFilter
UsernamePasswordAuthenticationFilter: 处理身份验证表单提交的过滤器。
ClientCredentialsTokenEndpointFilter: OAuth2令牌端点和身份验证端点过滤器。
OAuth2ClientAuthenticationProcessingFilter: 从授权服务器获取OAuth2访问令牌,并将身份验证对象加载到SecurityContext。
我们是研究如何它如何装载到SecurityContext里面去的,所以我们着重看OAuth2ClientAuthenticationProcessingFilter过滤器。
org.springframework.security.oauth2.client.filter.OAuth2ClientAuthenticationProcessingFilter就是OAuth2的客户端过滤器,它的作用就是将前面我们RemoteService拿到的身份校验信息装载到SecurityContext中。
它继承了org.springframework.security.web.authentication.AbstractAuthenticationProcessingFilter抽象类。
attemptAuthentication是AbstractAuthenticationProcessingFilter抽象类中的抽象方法,交给子类去实现的,作用就是尝试进行认证。

因为AbstractAuthenticationProcessingFilter毕竟是继承了GenericFilterBean实现的过滤器,所以,来看一下filter方法:
这里我贴一下代码,方便我在代码中写注释:
    @Override
    public void doFilter(ServletRequest request, ServletResponse response, FilterChain chain)
            throws IOException, ServletException {
        doFilter((HttpServletRequest) request, (HttpServletResponse) response, chain);
    }

    private void doFilter(HttpServletRequest request, HttpServletResponse response, FilterChain chain)
            throws IOException, ServletException {
        if (!requiresAuthentication(request, response)) {
            chain.doFilter(request, response);
            return;
        }
        try {
            // 交给子类实现的尝试进行认证的抽象方法,就上面我说的OAuth2ClientAuthenticationProcessingFilter过滤器的attemptAuthentication
            Authentication authenticationResult = attemptAuthentication(request, response);
            if (authenticationResult == null) {
                // return immediately as subclass has indicated that it hasn't completed
                return;
            }
            this.sessionStrategy.onAuthentication(authenticationResult, request, response);
            // Authentication success
            if (this.continueChainBeforeSuccessfulAuthentication) {
                chain.doFilter(request, response);
            }
            // 身份认证成功
            successfulAuthentication(request, response, chain, authenticationResult);
        }
        catch (InternalAuthenticationServiceException failed) {
            this.logger.error("An internal error occurred while trying to authenticate the user.", failed);
            unsuccessfulAuthentication(request, response, failed);
        }
        catch (AuthenticationException ex) {
            // Authentication failed
            unsuccessfulAuthentication(request, response, ex);
        }
    }
successfulAuthentication源代码:
这就是这篇文章的目的,装载身份验证信息:SecurityContextHolder.getContext().setAuthentication(authResult);
    protected void successfulAuthentication(HttpServletRequest request, HttpServletResponse response, FilterChain chain,
            Authentication authResult) throws IOException, ServletException {
        // 装载身份验证信息
        SecurityContextHolder.getContext().setAuthentication(authResult);
        if (this.logger.isDebugEnabled()) {
            this.logger.debug(LogMessage.format("Set SecurityContextHolder to %s", authResult));
        }
        this.rememberMeServices.loginSuccess(request, response, authResult);
        if (this.eventPublisher != null) {
            this.eventPublisher.publishEvent(new InteractiveAuthenticationSuccessEvent(authResult, this.getClass()));
        }
        this.successHandler.onAuthenticationSuccess(request, response, authResult);
    }
- 本文标签: Java Spring OAuth2
- 本文链接: http://www.lzhpo.com/article/170
- 版权声明: 本文由lzhpo原创发布,转载请遵循《署名-非商业性使用-相同方式共享 4.0 国际 (CC BY-NC-SA 4.0)》许可协议授权
热门推荐


相关文章
关于我